Before & After: Stunning Bathroom Makeovers From Warner Robins Homes
Warner Robins homeowners are transforming outdated bathrooms into stunning spa-like retreats through strategic renovations that maximize ROI. You’ll find dramatic makeovers ranging from pink tile removals to curbless walk-in showers, budget-friendly guest bath upgrades using porcelain that mimics Carrara marble, and 1980s brown bathrooms reimagined with subway tiles and brushed nickel fixtures. These projects showcase efficient space planning, from 5×7 layouts with vertical storage solutions to master bath reconfigurations featuring floating double vanities and custom millwork. The detailed transformations below reveal exactly how local homeowners achieved designer-quality results.
Key Takeaways
- Pink tile bathrooms transformed with frameless glass showers, floating vanities, and neutral porcelain tiles for modern appeal.
- 1980s bathrooms updated by removing outdated colors, adding white subway tiles, and installing water-efficient fixtures.
- Master baths reconfigured with curbless walk-in showers, double-sink vanities, and custom marble countertops for enhanced functionality.
- Budget-friendly makeovers achieve luxury using porcelain tiles mimicking marble, herringbone patterns, and DIY geometric accent walls.
- Half-baths maximized with wall-mounted sinks, concealed cistern toilets, and large-format tiles for improved space efficiency.
From Dated Pink Tile to Contemporary Spa Retreat
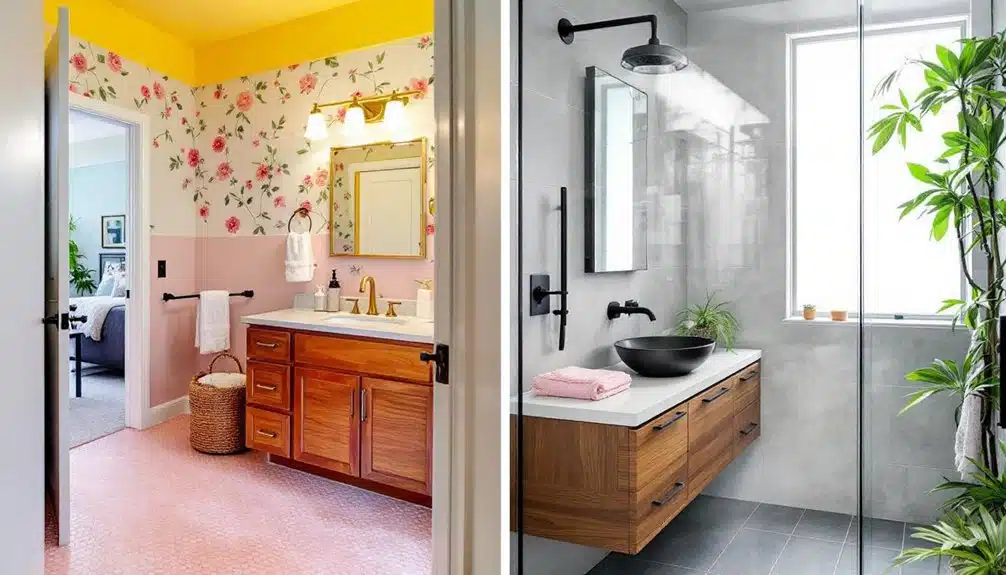
While mid-century pink tile bathrooms possess undeniable vintage charm, they often feel claustrophobic and outdated in modern homes. This Warner Robins transformation demonstrates how strategic pink tile removal can revolutionize your space into a serene sanctuary.
The renovation replaced cramped fixtures with a frameless glass shower enclosure and floating double vanity in warm oak. Designers incorporated spa retreat features including rainfall showerheads, heated flooring, and ambient LED lighting systems. Neutral porcelain tiles in large-format sizes create visual continuity, while textured accent walls add depth without overwhelming the senses.
You’ll appreciate the thoughtful storage solutions—recessed niches and custom cabinetry—that maintain the minimalist aesthetic. Professional installers implemented Schluter waterproofing systems to ensure long-lasting protection against moisture damage and mold growth. This makeover proves that honoring your family’s need for tranquility doesn’t require sacrificing functionality or style.
Cramped Half-Bath Transformed Into a Functional Powder Room
Since half-baths typically occupy the smallest footprint in your home, they’re often relegated to purely utilitarian status—but this Atlanta renovation demonstrates how spatial reconfiguration can improve a 20-square-foot afterthought into an architectural statement. The designer implemented vertical space optimization by installing a wall-mounted vessel sink and concealed cistern toilet, recovering eight essential inches. A custom-fabricated corner vanity with integrated storage eliminated visual clutter while maximizing usable surface area. Stylish fixtures including a pivoting mirror and linear LED sconces created ambient layering without overwhelming the compact footprint. The strategic use of large-format porcelain tiles minimized grout lines, visually expanding the perimeter. Beyond aesthetic improvements, fewer grout lines also simplified maintenance routines by reducing areas where dirt and mildew typically accumulate. This transformation proves you can deliver sophisticated hospitality to guests even within the tightest spatial constraints, elevating their experience through intentional design choices.
The ‘$3,000 Guest Bathroom That Looks Like $10,000’
Budget-conscious homeowners often assume luxury aesthetics require premium expenditures, but this Denver renovation demonstrates how strategic material selection and DIY implementation can deliver high-end results at a fraction of typical costs. You’ll notice the homeowners prioritized budget friendly upgrades like porcelain tiles mimicking Carrara marble ($2.89/sq ft versus $15/sq ft for genuine stone) and brushed brass fixtures from wholesale suppliers. They achieved luxury finishes through careful layering: subway tiles in herringbone pattern, floating walnut-stained vanity with undermount sink, and matte black hardware creating sophisticated contrast. The show-stopping element—a geometric accent wall using remnant tiles—cost under $200. The custom shower installation incorporated Schluter waterproofing products to ensure longevity without compromising the project’s affordable price point. By investing sweat equity in installation and sourcing materials strategically, you can replicate designer aesthetics while maintaining accessible price points that serve your family’s financial wellbeing.
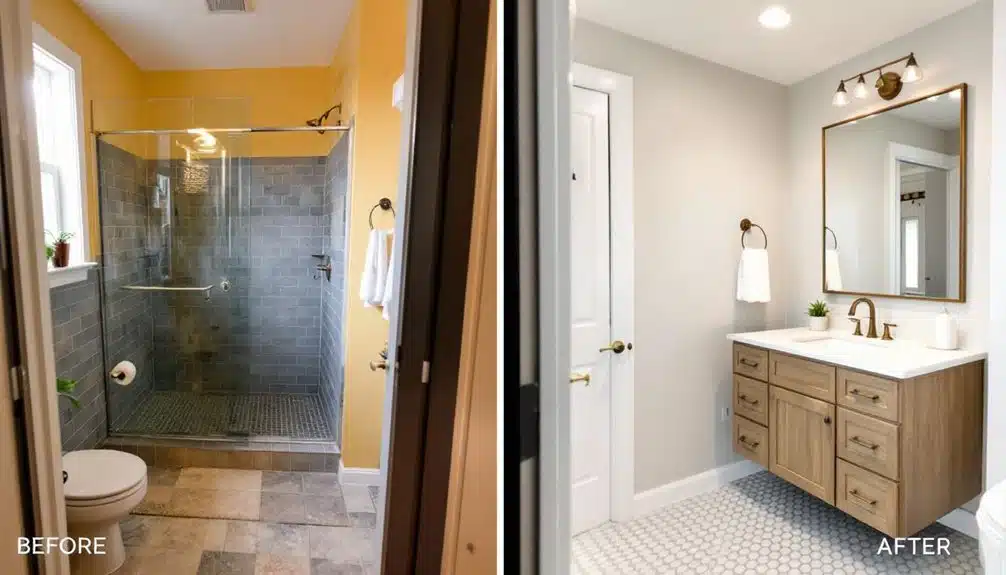
Turning a 1980s Brown Bathroom Into a Bright Modern Space
Though 1980s bathrooms dominated residential construction with their signature mauve, almond, and chocolate brown palettes, you’ll find these dated color schemes now present the perfect canvas for dramatic transformations. Strategic removal of harvest gold fixtures and brown-toned ceramic tile creates opportunities for crisp white subway installations that maximize natural light reflection. You can implement innovative lighting through recessed LED systems and contemporary sconces, replacing outdated brass fixtures with brushed nickel alternatives. Modern renovations incorporate bold color schemes through accent walls in navy or charcoal, balanced against neutral bases that serve your family’s evolving needs. Updated ventilation systems and water-efficient fixtures demonstrate environmental stewardship while engineered quartz countertops provide antimicrobial surfaces ideal for guest-friendly spaces. Consider replacing old flooring with luxury vinyl plank that mimics the warmth of hardwood while offering superior moisture resistance and comfort underfoot. This transformation prioritizes both aesthetic appeal and functional hospitality.
Small Master Bath Gets a Layout Overhaul

While color updates refresh surfaces, reconfiguring spatial flow addresses the foundational challenge many homeowners face: inefficient master bath layouts that waste square footage. Strategic layout improvements transform cramped quarters into functional retreats.
| Layout Element | Before | After |
|---|---|---|
| Shower Configuration | Cramped 32″ prefab unit | Curbless 48″ walk-in |
| Vanity Placement | Single-sink corner install | Double-sink floating design |
| Storage Solution | Inadequate medicine cabinet | Floor-to-ceiling linen tower |
This Warner Robins renovation relocated plumbing fixtures to maximize circulation patterns. The repositioned vanity created counter space while the expanded shower eliminated barriers. The homeowners also upgraded to custom marble countertops that brought timeless elegance to the redesigned vanity area. When you’re seeking design inspiration for compact spaces, remember that thoughtful spatial planning delivers more impact than cosmetic updates alone. Prioritizing workflow over aesthetics initially guarantees your bathroom serves daily routines efficiently.
DIY Subway Tile Magic: A Weekend Warrior’s Success Story
Subway tile transforms your bathroom with its clean lines and timeless appeal, but execution determines whether you’ll achieve that coveted modern aesthetic or a DIY disaster. You’ll need to master three critical elements: selecting tile dimensions and finish that complement your space’s proportions, implementing proper installation techniques including waterproofing and layout strategies, and choosing grout colors and application methods that improve rather than detract from your design vision. Let’s break down each component to guarantee your weekend project delivers professional-grade results.
Choosing the Right Tile
How can you transform a dated bathroom into a magazine-worthy space without hiring professional installers? Start by selecting tiles that enhance your clients’ daily routines. Consider these crucial factors:
| Tile Aspect | Practical Choice | Design Impact |
|---|---|---|
| Size | 3×6 subway | Classic, timeless appeal |
| Finish | Matte white | Hides water spots effectively |
| Layout | Herringbone pattern | Adds visual interest |
| Grout | Charcoal gray | Conceals staining naturally |
| Accent | Pencil trim | Professional finishing touch |
When evaluating tile color, neutral palettes provide versatility for future updates. Tile patterns like running bond or vertical stack create distinct atmospheres—herringbone introduces movement while grid layouts offer structured simplicity. Match your selection to the homeowner’s lifestyle needs, ensuring durability meets aesthetic vision for lasting satisfaction.
Installation Tips and Tricks
Once you’ve locked in your tile selection, proper surface preparation determines whether your installation withstands daily moisture exposure or fails within months. You’ll need to address plumbing basics first—shut off water supply lines and remove fixtures carefully to prevent damage. Apply waterproof membrane to all wet zones, extending coverage six inches beyond shower boundaries. Your substrate must be level within 1/8-inch variation to prevent lippage between tiles.
Use notched trowels sized appropriately for your tile dimensions, maintaining consistent coverage to avoid hollow spots. Installing tile spacers guarantees uniform grout lines that improve visual appeal while simplifying tile maintenance. Allow thinset to cure fully before grouting—typically 24-48 hours. This patience protects your investment and serves your household’s long-term needs.
Grout Selection and Application
Your grout choice shapes the entire aesthetic of your subway tile installation while serving as the primary defense against moisture infiltration. Understanding grout color psychology helps create spaces that resonate with your family’s needs—lighter hues expand visual space while darker tones mask grout maintenance demands.
| Grout Type | Best Application | Maintenance Level |
|---|---|---|
| Epoxy | Shower enclosures | Minimal |
| Urethane | High-traffic floors | Low |
| Cement-based | Wall installations | Moderate |
| Acrylic-modified | Backsplashes | Low-moderate |
| Furan resin | Commercial spaces | Minimal |
Apply grout using diagonal sweeping motions across joints, ensuring complete penetration. Remove excess within twenty minutes using dampened sponges. Seal cement-based grout after seventy-two hours to maximize longevity and simplify future grout maintenance protocols for your clients.
Vintage Charm Meets Modern Convenience in This Historic Home Update
While preserving original architectural elements in a historic bathroom presents unique challenges, strategic integration of contemporary fixtures can improve both functionality and aesthetic appeal without compromising period authenticity. You’ll find success by layering vintage fixtures—clawfoot tubs, pedestal sinks, and brass hardware—with modern amenities like thermostatic shower valves and heated flooring systems. This Warner Robins restoration demonstrates how reclaimed subway tiles paired with LED mirror lighting create timeless elegance while meeting today’s energy standards. You can honor your clients’ heritage homes by sourcing period-appropriate reproductions that conceal contemporary water-saving technology. Install undermount fixtures behind traditional facades, ensuring your design serves both preservation goals and daily comfort needs. The result delivers authentic character without sacrificing performance or sustainability.
From Builder Grade to Custom Luxury on a Modest Budget
You don’t need a contractor’s budget to achieve designer-level results—just strategic thinking about where your dollars create maximum visual impact. Focus your spending on high-touch elements like faucet finishes, cabinet hardware, and lighting fixtures that enhance the entire space, while deploying cost-effective swaps for builder-grade mirrors, basic vanity doors, and standard shower heads. This methodical approach to prioritization transforms generic bathrooms into custom-feeling retreats without the luxury price tag.
Strategic Upgrade Prioritization
When transforming a builder-grade bathroom into a custom luxury space, the fixtures and finishes you prioritize will determine whether your budget delivers maximum visual impact or gets diluted across superficial updates. Smart budget allocation focuses resources where they’ll create lasting impressions for your household and guests.
Your design priorities should emphasize:
- Vanity and countertop upgrades – Replace particle board cabinetry with solid wood construction and laminate surfaces with quartz or marble
- Plumbing fixture replacements – Install brushed nickel or matte black faucets, rainfall showerheads, and coordinated hardware
- Tile installation in wet zones – Focus premium materials on shower surrounds and flooring rather than entire walls
This targeted approach guarantees your investment creates professional-grade results that enhance daily living experiences.
High-Impact, Low-Cost Swaps
Strategic material substitutions can transform your bathroom’s aesthetic without requiring a contractor’s budget or timeline. You’ll achieve designer-level results by replacing builder-grade faucets with stylish fixtures in matte black or brushed gold finishes. Consider swapping standard mirrors for beveled or LED-backlit alternatives that amplify perceived space while adding sophistication.
Budget friendly upgrades include replacing plastic hardware with solid brass knobs, installing peel-and-stick tile backsplashes, and upgrading shower curtains to weighted linen blends. You can refinish existing vanities using chalk paint techniques rather than purchasing new cabinetry. Replace outdated light bars with sconces flanking mirrors for improved task lighting and visual interest.
These tactical swaps deliver maximum transformation while preserving resources you can redirect toward serving your family’s broader home improvement needs throughout Warner Robins properties.
The Accessible Bathroom Remodel That Didn’t Sacrifice Style
How can a bathroom accommodate mobility needs while maintaining a sophisticated aesthetic? This Warner Robins renovation proves accessible design doesn’t compromise elegance. The homeowners prioritized safety for aging parents while selecting stylish fixtures that enhance the space.
The transformation included:
- Zero-threshold shower with linear drain – Curbless entry pairs seamlessly with large-format porcelain tiles, creating visual continuity while eliminating trip hazards
- Wall-mounted floating vanity – Provides wheelchair clearance beneath while offering a contemporary, spa-like appearance with integrated LED lighting
- Decorative grab bars in brushed brass – Strategically positioned support rails double as towel bars, blending functionality with the room’s warm metallic accents
You’ll notice how thoughtful planning transforms universal design principles into sophisticated solutions that benefit everyone who uses the space.
Maximizing Storage in a Tiny 5×7 Bathroom
When you’re working with a compact 5×7 footprint, strategic storage solutions become non-negotiable design elements rather than afterthoughts. You’ll need to exploit every vertical inch while incorporating recessed medicine cabinets and wall-mounted vanities that create the illusion of more square footage. Corner niches, floating shelves with integrated LED lighting, and mirrored cabinet doors transform dead zones into functional storage without compromising your bathroom’s contemporary aesthetic.
Vertical Space Solutions
Since floor area remains fixed in a 5×7 bathroom, you’ll need to exploit the room’s vertical dimensions to create functional storage without sacrificing circulation space. Wall-mounted storage systems prove crucial for maintaining accessibility while maximizing capacity.
Strategic vertical solutions include:
- Recessed medicine cabinets that extend 4-6 inches into wall cavities, eliminating visual bulk
- Floating vanities with integrated toe-kick drawers that recover typically wasted space beneath cabinetry
- Ladder-style shelving units positioned above toilets, transforming dead zones into functional display areas
You can incorporate vertical gardens using moisture-resistant plant species to improve air quality while utilizing narrow wall sections. Install chrome-finished towel bars with integrated shelving brackets to serve dual purposes, ensuring every vertical inch contributes to your clients’ organizational needs.
Hidden Storage Behind Mirrors
While most designers default to standard medicine cabinets, you’ll achieve superior storage density by specifying full-width mirrored wall systems with concealed cabinet depths of 5-8 inches. These installations transform entire walls into functional hidden compartments while maintaining the illusion of spaciousness that mirrors provide.
Warner Robins homeowners have adopted recessed mirror designs with integrated LED lighting strips and adjustable shelving systems. You’ll want to specify soft-close hinges and magnetic catches for seamless operation. Consider organizing zones within: daily medications at eye level, guest toiletries mid-height, and backup inventory below.
The technical advantage lies in recessing cabinets between wall studs, eliminating protrusion into your limited floor space. Frameless mirror designs create continuous reflective surfaces that visually double your bathroom’s perceived dimensions while concealing substantial storage capacity.
Corner Shelving Installation Tips
Corner installations release 20-30% additional storage capacity in 5×7 bathrooms where every cubic inch matters. You’ll maximize vertical space while maintaining accessibility for family members and guests who need vital items within reach.
Strategic implementation requires these fundamentals:
- Level verification: Use a laser level to establish plumb reference lines, ensuring corner shelf styles integrate seamlessly with existing tile grout lines
- Anchor selection: Toggle bolts for hollow walls, masonry anchors for tile installations—load capacity determines hardware specifications
- Height optimization: Position shelves at 42″, 60″, and 72″ intervals to accommodate varied user heights
Your installation tools should include a cordless drill, carbide-tipped masonry bits, and marine-grade silicone sealant. These corner configurations transform previously wasted spatial voids into functional zones that serve everyone’s daily routines efficiently.
Conclusion
You’ve seen how Warner Robins homeowners transformed outdated spaces into design-forward sanctuaries. Take the 1980s brown bathroom that became a bright, modern retreat—strategic use of large-format porcelain tile, floating vanities, and brushed nickel fixtures created contemporary sophistication without demolition costs. Whether you’re working with a compact 5×7 footprint or tackling a full master suite renovation, these projects prove that thoughtful material selection, smart spatial planning, and attention to current design trends deliver spa-worthy results at accessible price points.