Waterproofing Done Right: Behind the Scenes of a Custom Shower Build
Waterproofing is essential for your custom shower build, as it safeguards against moisture damage and mold growth. Start by selecting high-quality membranes and adhesives suitable for wet environments. Prepare your shower area meticulously by measuring dimensions and ensuring a clean, level subfloor. Follow precise waterproofing techniques, sealing joints and conducting water tests to guarantee watertightness. Regular maintenance is key to longevity. Keep exploring to uncover best practices and common pitfalls in effectively waterproofing your shower.
Key Takeaways
- Effective waterproofing prevents water damage and mold growth, ensuring a durable custom shower environment.
- Select appropriate waterproofing materials, such as sheet membranes or liquid-applied options, for reliable moisture control.
- Prepare the shower area by measuring dimensions accurately and ensuring a clean, level subfloor for optimal installation.
- Follow step-by-step waterproofing techniques, including sealing joints and conducting water tests for watertightness.
- Regular maintenance, such as cleaning and inspecting seals, is crucial for the longevity of the waterproofed shower.
Understanding the Importance of Waterproofing

When you’re designing a custom shower, understanding the importance of waterproofing isn’t just a detail—it’s vital. Effective moisture control is fundamental to prevent water damage that can compromise your entire bathroom. Water leaks can lead to mold growth, structural damage, and costly repairs. By prioritizing waterproofing, you guarantee a durable and safe shower environment for everyone who uses it. Consider incorporating proper drainage systems and sealing joints to eliminate potential water intrusion points. Remember, your goal is to create a space that not only looks beautiful but likewise serves its purpose effectively. Investing time and resources into robust waterproofing techniques will pay off in the long run, enhancing both the functionality and longevity of your custom shower. Additionally, utilizing a family of waterproofing products ensures that your shower remains watertight and protected against moisture damage.
Selecting the Right Waterproofing Materials
Choosing the right waterproofing materials is crucial for guaranteeing your custom shower stands the test of time. You’ll want to evaluate various membrane options and adhesive types to provide the best protection against moisture. Here are some key factors to keep in mind:
- Membrane Options: Look for waterproof membranes like sheet membranes or liquid-applied membranes, which create a barrier against water intrusion.
- Adhesive Types: Use adhesives that are specifically formulated for wet environments, guaranteeing a strong bond.
- Durability: Choose materials that can withstand temperature fluctuations and everyday wear.
- Compatibility: Verify all materials work well together, from substrates to finishes, to prevent future issues. Additionally, consider using Schluter’s waterproofing products which are designed to create a watertight tiled shower.
Preparing the Shower Area for Installation
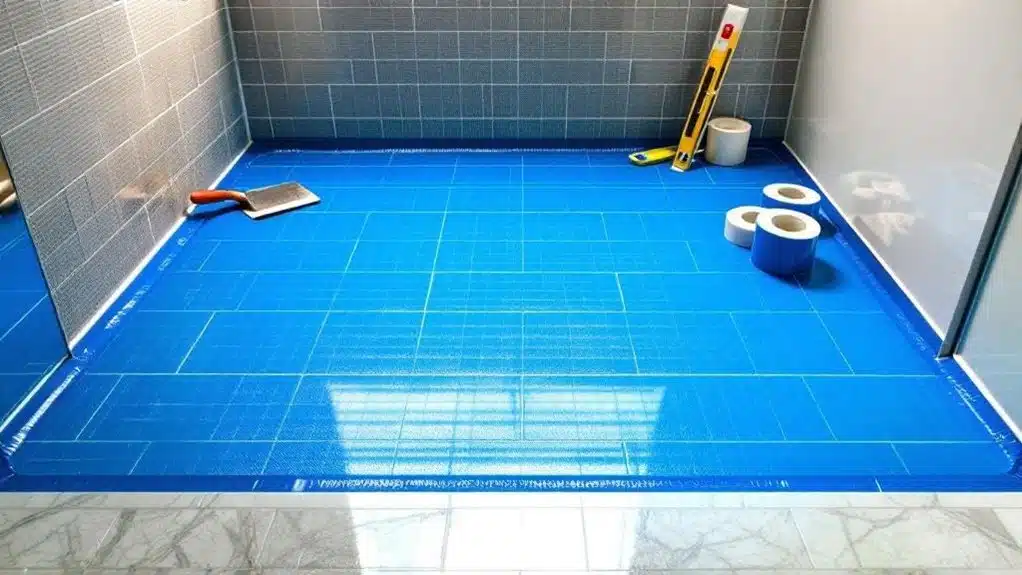
Before diving into the installation process, it’s essential to prepare the shower area properly to guarantee a smooth and successful build. Start by measuring your shower dimensions accurately; this verifies that all components fit seamlessly. Next, identify the ideal drain placement to prevent water pooling and promote efficient drainage. Mark the location, considering the slope required for peak water flow. Remove any existing fixtures or materials that could interfere with the new installation. Confirm the subfloor is clean, level, and free from any debris. If needed, reinforce the floor to support the weight of the shower. By taking these steps, you lay a solid foundation for waterproofing and creating a shower that serves your needs effectively. Additionally, consider incorporating heated floors to enhance comfort and luxury in your shower experience.
Step-by-Step Waterproofing Techniques
Waterproofing your shower is vital to preventing leaks and damage, and it involves several key steps. By following these effective waterproofing methods, you’ll guarantee a durable shower design that stands the test of time:
- Choose the Right Membrane: Select a high-quality waterproof membrane suitable for your specific environment.
- Properly Prepare Surfaces: Clean and smooth all surfaces to promote proper adhesion of waterproofing materials.
- Seal All Joints and Corners: Use caulk or sealant to thoroughly seal joints and corners, preventing water intrusion.
- Test for Leaks: Before final installation, conduct a water test to verify all areas are watertight.
Common Mistakes to Avoid in Waterproofing
While it may seem straightforward, many DIY enthusiasts fall into common traps during the waterproofing process. One major issue is neglecting the importance of a quality waterproof membrane. Waterproof membrane failures often arise when the membrane is improperly installed or cheap materials are used. Don’t skimp on this essential component; it’s your first line of defense against water damage.
Another frequent mistake involves improper drainage solutions. If water can’t flow away from your shower, it’ll pool and create problems over time. Be certain to establish a proper slope in your shower pan and consider installing drainage systems that effectively manage excess water. By avoiding these pitfalls, you’ll guarantee your custom shower remains watertight and functional for years to come.
Maintaining Your Waterproofed Shower for Longevity
To guarantee your waterproofed shower lasts, you need to adopt regular cleaning practices and inspect seals frequently. Dirt and grime can break down materials, while damaged seals can lead to leaks over time. By staying proactive, you’ll protect your investment and maintain its functionality.
Regular Cleaning Practices
Maintaining a waterproofed shower requires regular cleaning practices to confirm its longevity and functionality. Adopting effective cleaning techniques is crucial for preventing mold and keeping your shower looking pristine. Here are some recommended practices:
- Rinse surfaces after each use to remove soap scum and residue.
- Use a squeegee to wipe down walls and glass doors, minimizing water spots.
- Apply a vinegar solution weekly to combat hard water stains and kill mold spores.
- Regularly check and clean grout lines to prevent buildup and guarantee mold prevention.
Inspecting Seals Frequently
Regularly inspecting the seals around your shower is essential for ensuring its waterproof integrity. By monitoring the condition of these seals, you can prevent water damage and maintain a safe environment. Make it a habit to check seals at least once a month, focusing on areas prone to wear and tear.
| Inspection Frequency | Seal Condition | Action Needed |
|---|---|---|
| Monthly | Pristine | No action needed |
| Monthly | Minor wear | Reseal |
| Quarterly | Moderate wear | Replace seal |
| Bi-Annually | Severe damage | Full inspection |
| Annually | Deteriorated | Professional help |
Conclusion
To sum up, getting waterproofing right is essential for a long-lasting, functional shower. Did you know that nearly 30% of all bathroom renovations are because of water damage? By following the proper techniques and avoiding common pitfalls, you can guarantee your custom shower not only looks great but likewise stands the test of time. Regular maintenance will help you enjoy your investment for years to come, keeping leaks and mold at bay. Happy showering!